- Discover Snowsports
- Staying Safe
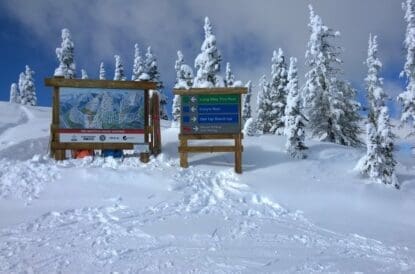
- Piste Maps
What can a piste map tell you about the mountain? Well, everything pretty much. At its simplest level, a piste map is just that, a plan of all the pistes on a mountain and in a resort. Colour coded by difficulty, they allow you to make good choices about the routes you ski to ensure you are always skiing within your ability. More than that, however, they show ski lifts of all varieties, useful points of notes such as mountain restaurants and first aid points, notable landmarks to look out for such as notable nearby peaks or national parks, and features such as beginner areas or children’s exploration areas.
Table of Piste Colours
Different regions use different combinations of four basic colours – green, blue, red and black – to identify the difficulty of each slope on a piste map and on the mountain. It is the best tool to help you ski within your ability.
Piste difficulties are not a fixed measure – one resort’s blue might be another resort’s red run, and it gives no indication of how well maintained the run might be at any given time. As a rule of thumb, Double Black Diamond runs in North America are almost always steep unpisted runs, so expect plenty of moguls!
Table of Piste Colours
| Region | Beginner | Intermediate | Advanced | Expert |
| Europe (exc. AUS and SWI) | Green | Blue | Red | Black |
| Austria and Switzerland | Blue | Red | Black | |
| North America | Green Circle | Blue Square | Black Diamond | Double Black Diamond |
| Japan | Green | Red | Black | |
| Australia and New Zealand | Green | Blue | Black | Double Black Diamond |
| South America | Green | Blue | Red | Black |
Types of Ski Lift
All ski lifts will be marked on a piste map, too. they come in a variety of shapes and sizes, some of them more useful for beginners than others! Note that many of these lifts don’t allow for “downloading” (i.e. catching the lift back down) or pedestrians, or this is done on a resort-by-resort and lift-by-lift basis, so if you are planning on visiting a resort just to take in the views make sure you can get up and down again!
Surface lifts:
As their name implies, these lifts take you uphill on the surface of the snow and aren’t too long. Magic carpets are usually found in beginner areas and are like the travelators found in long airport corridors – they are slow moving and easy to get on and off, making them easy for those just starting out. Drag or Poma lifts and T-Bars can be found in most resorts and are a little tougher to use, especially for snowboarders, as they require you to balance and keep your edges from catching. These days, they are mostly used to access difficult terrain that don’t need the capacity of big lifts, with Tignes-Val d’Isere being the best example – several button lifts exist solely to serve some of the best off-piste areas in the valley! However, less developed resorts still feature drag lifts prominently, such as those in Scotland.
Chairlifts:
These are lifts that you sit on, without removing your skis or board, and they travel above the ground at a faster speed than surface lifts. Older lifts can be a little tricky to get on and off as they don’t slow down at each end. More modern lifts either have a rolling carpet to help you get on or the chair detaches from the cable to slow down at the bottom. Some lifts even have heated seats, wifi and weather covers for added comfort. They range in size from old 1-seaters – often without any safety equipment like a safety bar! – to fast new 8-seaters. On some occasions chairlifts may permit pedestrians and downloading, but this should never be assumed.
Gondolas or Cable Cars:
Large cabins are suspended from ropeways and can transport large numbers of skiers and pedestrians quickly over large distances or up steep inclines. Like chairlifts they range in size and efficiency, some resorts still have older 2-to-4-person “yoghurt pots” and others have double-decker trams capable of carrying over 200 people. Suitable for pedestrians and often accessible via one off pedestrian tickets.
Funiculars:
Funiculars are mountain railways that are capable of climbing steep gradients, usually using two trams in counterweight to each other. Most can carry several hundred passengers up and down the mountain. Many travel from resort level up to the top of the mountain through tunnels to protect them from snow and ice.
Other Map Features
So what else can you learn from piste maps? As well as local features such as landmark mountain peaks visible from the resort to natural park features, there are a whole host of useful features detailed.
- Mountain restaurants: typically marked with a knife and fork symbol.
- Picnic area: you can bring your own food to the spots marked with a picnic table, some are sheltered others are open to the elements, this is usually noted on the map.
- Ski patrol: A cross (usually in yellow or red) shows where you can find piste patrollers for assistance. Their emergency contact number will also be listed on the map.
- Toilets: pretty self explanatory, but when you need to go it’s handy to know where to find one!
- Area/valley links: some ski areas are split into different areas which your pass may or may not be valid for so make sure you know before skiing into other zones. It’s also handy to know where your valley boundary is in case of bad weather as the lifts over the top are usually the first to close. This might make getting back to your resort difficult and expensive.
- Luge tracks: Or sledging areas, these look like pistes in most cases but you shouldn’t ski on them in case of collision, you can rent or buy sledges to use on these. Marked by a sledge symbol on the map.
- Floodlit area: some resorts offer night skiing on certain evenings, the pistes with floodlighting are often marked on the map.
- Fun parks: Sometimes these are given a snowboarder symbol sometimes they are marked by a coloured block – these are areas with jumps, rails pipes or boarder cross courses, most are fenced off from the main pistes and many require that you wear a helmet.
- Heli pads or Altiports: Where the helicopters land and take off or small, intricate airports built into the side of the mountain. Mainly for emergencies or for the wealthy to fly directly to and from resort, they act as a useful point to orientate from.
- Ski area boundary: More commonly found in the US, a red- or black-dashed line indicates the end of the patrolled ski area, or any restricted area in-bounds. Skiing in these areas or beyond the edge of the resort can result in the removal of your lift pass or even a fine. You may also find blocked-off “nature reserves”
- Slow/Beginner zones: Entire runs may be designated as beginner zones, to allow beginners to learn to ski or stretch their legs in peace. Some resorts will enforce “Slow Zones” at bottle necks to reduce the risk of accident, often enforced by ski patrollers.
- Other: Some maps also have cross country ski tracks, hiking and touring trails marked on the map. Ticket offices, rental shops, information points and ski schools may also be marked.
Summary
When reading a piste map, remember to look out for the following:
- The colour of pistes is not uniform across countries
- Consider itinerary routes as off piste terrain
- Piste maps will indicate what type of lift each is
- Ski Patrol locations and contact numbers will be indicated on the piste map
- Other amenities, such as restaurants and public toilets, will be indicated
- Respect ski area boundaries, especially demarking in-bound restricted area – they are there for a reason!